 Blog
Blog
 Aug 26, 2026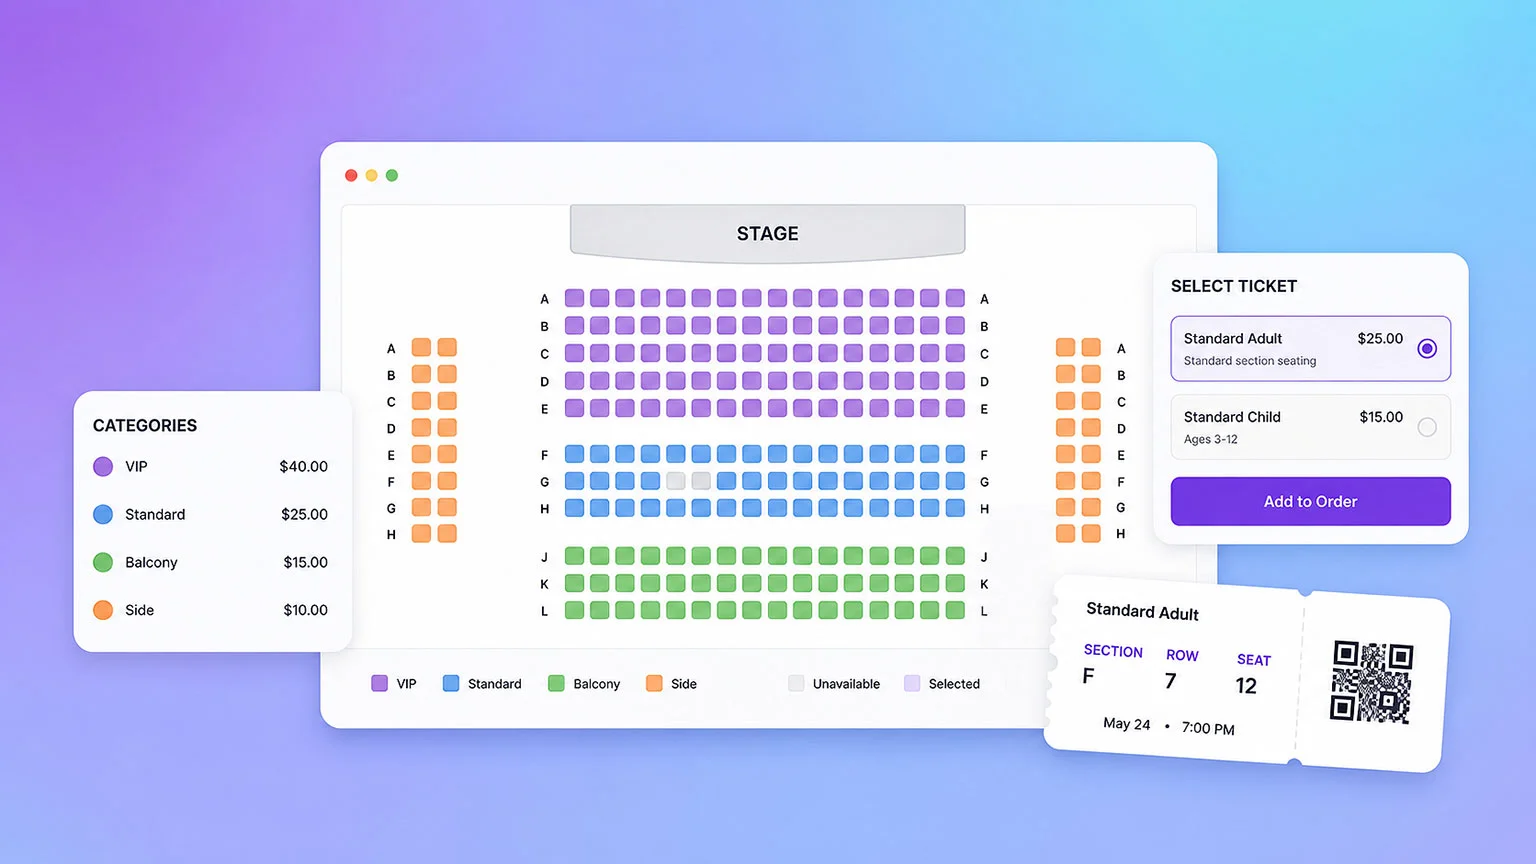
Reserved seating is now available in TicketsCandy!
You can create seating charts for your venue, connect them to your events, and sell tickets for specific seats. Seating charts can be used for many types of events and venues, from small table layouts and theaters to large arenas and stadiums with multiple sections and levels.
In this guide, we’ll walk through the full setup process:
- Create a seating chart
- Set up seat categories
- Connect the chart to an event
- Create Seated Tickets
- Review and manage your seats
- Test the customer checkout
- Scan seated tickets at your event
Let’s get started.
Step 1: Create Your Seating Chart
Seating charts are created at the account level, rather than inside an individual event.
This means you can create your venue layouts once and then select the appropriate chart when setting up an event.
To create a seating chart:
- Log in to your TicketsCandy Organizer Dashboard.
- Open Settings.
- Select Seating Charts.
- Click Create New Seating Chart.
The seating chart editor will open and help you start building your venue.
You can create many different types of layouts, including:
- Individual rows of seats
- Tables and booths
- General sections
- Theater layouts
- Multiple levels or balconies
- Large stadium-style layouts
When you first open the editor, you will also have the option to view a short tutorial explaining the main chart-building tools.
If you need help creating a more complicated seating chart, contact TicketsCandy Support. We can help you figure out the best way to build your layout.
Step 2: Create Seat Categories
One of the most important parts of building your seating chart is setting up categories.
A category is a group of seats that will share the same ticket options.
For example, your venue might have categories such as:
- Center
- Side
- Balcony
- VIP
- Premium
- General Reserved
After creating a category, assign the appropriate seats or sections of your chart to it.
Why is this important?
When you create Seated Tickets later, each ticket is connected to one of these categories.
For example, imagine your chart has:
Center
- Adult: $20
- Child: $10
VIP
- VIP Admission: $40
You would assign the Adult and Child tickets to the Center category and the VIP Admission ticket to the VIP category.
When a customer clicks a seat in the Center section, they will see the Adult and Child ticket options.
When they click a seat in the VIP section, they will see the VIP ticket option instead.
You can also assign multiple ticket types to the same category. This is useful when the same seats have different prices for adults, children, seniors, members, or other ticket groups.
Step 3: Connect the Seating Chart to Your Event
Once your seating chart is ready, the next step is connecting it to an event.
For a new event
Go to My Events and start creating your event.
During the event setup, find the Enable Seating Charts option and turn it on.
A Seating Chart dropdown will appear. Select the chart you created from the list.
Then continue creating your event as usual.
For an existing event
Open the event in your Organizer Dashboard and go to:
Event Settings → General
Find Enable Seating Charts and turn it on.
Then choose your seating chart from the Seating Chart dropdown and save your changes.
Important
Choose your seating chart carefully before you begin selling tickets.
Seated Tickets are connected to categories inside a specific chart. Once Seated Tickets have been created for the event, you cannot switch the event to a different seating chart without first removing those seated tickets.
This prevents seat and ticket connections from becoming invalid.
Step 4: Create Your Seated Tickets
After seating charts are enabled for the event, a new ticket type becomes available: Seated Ticket.
Go to the Tickets page inside your event dashboard and click Create Ticket.
Select Seated Ticket as the ticket type.
You can then configure settings such as:
- Ticket name
- Ticket description
- Regular price
- Discounted price
- Minimum tickets per order
- Maximum tickets per order
- Seat Category
The Seat Category setting connects the ticket to the category you created in your seating chart.
For example, if you are creating a ticket for your Center section, select Center from the Seat Category dropdown.
You could then create:
- Center Adult – $20
- Center Child – $10
and connect both tickets to the Center category.
Customers selecting seats from that section would then be able to choose between those two ticket options.
You can repeat this process for each section or pricing group in your venue.
Once everything is configured, click Create Ticket.
You Can Still Sell Regular Tickets Too
Enabling seating charts does not mean every ticket on your event needs to be a reserved seat.
Your event can also include regular Tickets, Passes, Add-ons, Donations, and other supported ticket types alongside your Seated Tickets.
This can be useful for events that have both reserved and non-reserved areas.
For example, an event might sell:
- Reserved theater seats
- General admission tickets
- Parking passes
- VIP add-ons
- Donations
all from the same event page.
Step 5: Manage Sold and Blocked Seats
Once seating charts are enabled, your event dashboard will include an additional seating management page.
Here you can open the seating chart and quickly see which seats have already been purchased.
If your event has multiple dates or time slots, select a specific date and time to see the seating availability for that particular session.
This makes it easy to see how your venue is filling up before each performance or event time.
You can also block seats directly from this page.
Blocking is useful when you need to keep certain seats unavailable without selling them.
For example, you might block seats for:
- Staff
- Performers
- Sponsors
- Accessibility needs
- Equipment
- Venue requirements
- Last-minute holds
If the seat becomes available again, you can unblock it and return it to sale.
Step 6: Check the Customer Experience
Before publishing and promoting your event, we recommend going through the ticket-buying process yourself.
Open your public event page and click Get Tickets.
The exact flow depends on how your event is configured.
Events with dates or time slots
If your event uses a booking calendar, the customer will first choose their event date and time.
After selecting the date and time, the seating chart will appear.
The customer can then:
- Select their preferred seat.
- Choose one of the ticket options available for that seat’s category.
- Add the ticket to their order.
- Continue through checkout.
This makes sure the seat reservation is connected to the correct event date and time.
One-time events
If your event does not require the customer to select a separate date or time, the seating chart can appear directly in the ticket-buying flow.
The customer selects their seat, chooses the available ticket type, and completes checkout.
What the Customer Receives
After the purchase is completed, the customer receives their TicketsCandy electronic ticket with a QR code.
For Seated Tickets, the ticket also includes information about the seat they selected.
Depending on your event setup, this can include details such as:
- Event date
- Event time
- Section
- Row
- Seat
This gives the attendee the information they need to find their seat when they arrive.
Viewing Seat Information in the Organizer Dashboard
Seat information is also available to you as the organizer.
You can review the assigned seat from the customer’s order and attendee information.
You can also open your event’s seating chart to get a visual overview of which seats have been sold and which seats are still available.
For events with multiple dates or times, use the date and time selector to view the seating chart for the session you want to review.
Scanning Seated Tickets at the Door
Seated Tickets work with the TicketsCandy Ticket Scanner app just like your regular tickets.
When you scan the attendee’s QR code, the scanner can also display their seat information. This makes it easier for your team to check the attendee in and direct them to the correct section or seat.
Before your event, make sure you are using the latest version of the TicketsCandy Ticket Scanner app so that all reserved seating information is supported.
A Few Important Seating Chart Rules
Before setting up your first event, keep these rules in mind:
- Seating charts are created from your account settings and then connected to events.
- Seated Tickets can only be created when Seating Charts are enabled for the event.
- Every Seated Ticket must be connected to a category from the selected chart.
- Multiple ticket options can be connected to the same category.
- Once Seated Tickets have been created, the connected seating chart cannot be changed unless those tickets are removed first.
- If customers need to select a date or time for your event, they will make that selection before choosing their seats.
- Seats can be manually blocked or unblocked from the organizer’s seating management page.
- Regular tickets and other ticket types can still be sold alongside Seated Tickets.
Ready to Start Selling Reserved Seats?
That’s everything you need for the basic setup.
Start by creating your venue layout under Settings → Seating Charts, connect it to your event, create your Seated Tickets, and then preview the checkout before you start promoting your event.
Reserved seating gives your attendees the ability to choose exactly where they want to sit while giving you a clear visual view of your venue and ticket sales.
If you have questions about setting up your seating chart or need help building a more complicated venue layout, contact TicketsCandy Support. We’ll be happy to help you get your seating chart ready for your event.