 Blog
Blog
 Oct 14, 2026
Will the worst part of your event happen before it even starts? That’s the dreaded line to get in. The process and the people involved (a guest searching for an email, a slow bag check, or a question about the wrong time slot) can quickly dampen an attendee’s enthusiasm.
So are you looking for a way to shorten the time attendees at your event will have to stand in line? How about setting up QR code event check-in? This would make it quick and efficient to confirm that a ticket can be used. On the backend it also makes it easy to capture attendance numbers, arrival times, and other metrics.
And the process is easy:
- Connect each ticket to a unique admission record
- Prepare your scanning devices
- Create a clear process for admitting guests and resolving problems
The physical scanner is only part of that process. You first have to set your tickets up to be read by it.
Let’s look at how TicketsCandy can help you do not just that but also prepare your tickets, estimate staffing, organize lines, and handle the moments when check-in doesn’t go as planned.
Improving the check-in process with a QR code
Adding a QR code to a ticket provides the check-in system a unique identifier it can use. Your ticketing platform will use that to confirm it is a valid ticket and to check against any admission restrictions.
The basic flow looks like this:
- Sell a ticket/Establish a code. When a ticket is purchased, an attendee will receive a code through the ticket platform’s supported delivery channel. This could be an email, a text, or a digital wallet.
- Read the code. Use your scanning app to capture the QR code at the gate.
- Validate admission. The ticket system will use the code to check the ticket against the event’s admission rules. Available checks depend on the platform and its settings.
- Record check-in. Staff members will confirm a code scan had a successful result and admit the guest. If the system is connected it can share the updated status with the organizer dashboard.
QR codes can be used in other ways as well. Placing a QR code on an event poster can open a sales page. A ticket QR code identifies an admission record; it does not prove a sale by itself. The record must still be valid for entry, whether the ticket was paid for or issued free.
To ensure the process is seamless for the attendee and smooth for staff, test it. And then test it again. You are looking to see what happens if a code is scanned twice, what the response is when a code on a refunded ticket is scanned, and what happens when there is a date change for the event. Our guide to choosing a ticketing service provides more questions for that wider evaluation.
The event check-in process needs to be ready for peak arrivals
When testing your QR code check in process, start with what your busiest period may be. You’ll find that five hundred people strolling in over three hours creates a different need than five hundred arriving just before the opening act.
As part of your testing process, outline the guest’s route from the queue to the event. As part of this journey make sure to include:
- ticket retrieval
- bag checks
- any required ID checks
- ticket scanning
- passing out and fitting wristbands or badges
Identify who performs each step and where guests wait between them.
How to calculate a starting number of scanning lanes
If you are trying to decide how many entry lanes you need, try this formula:
| Entry lanes needed
= Expected arrivals during the peak window ÷ Number of attendees one lane can process during that same window Take your answer and round it up. |
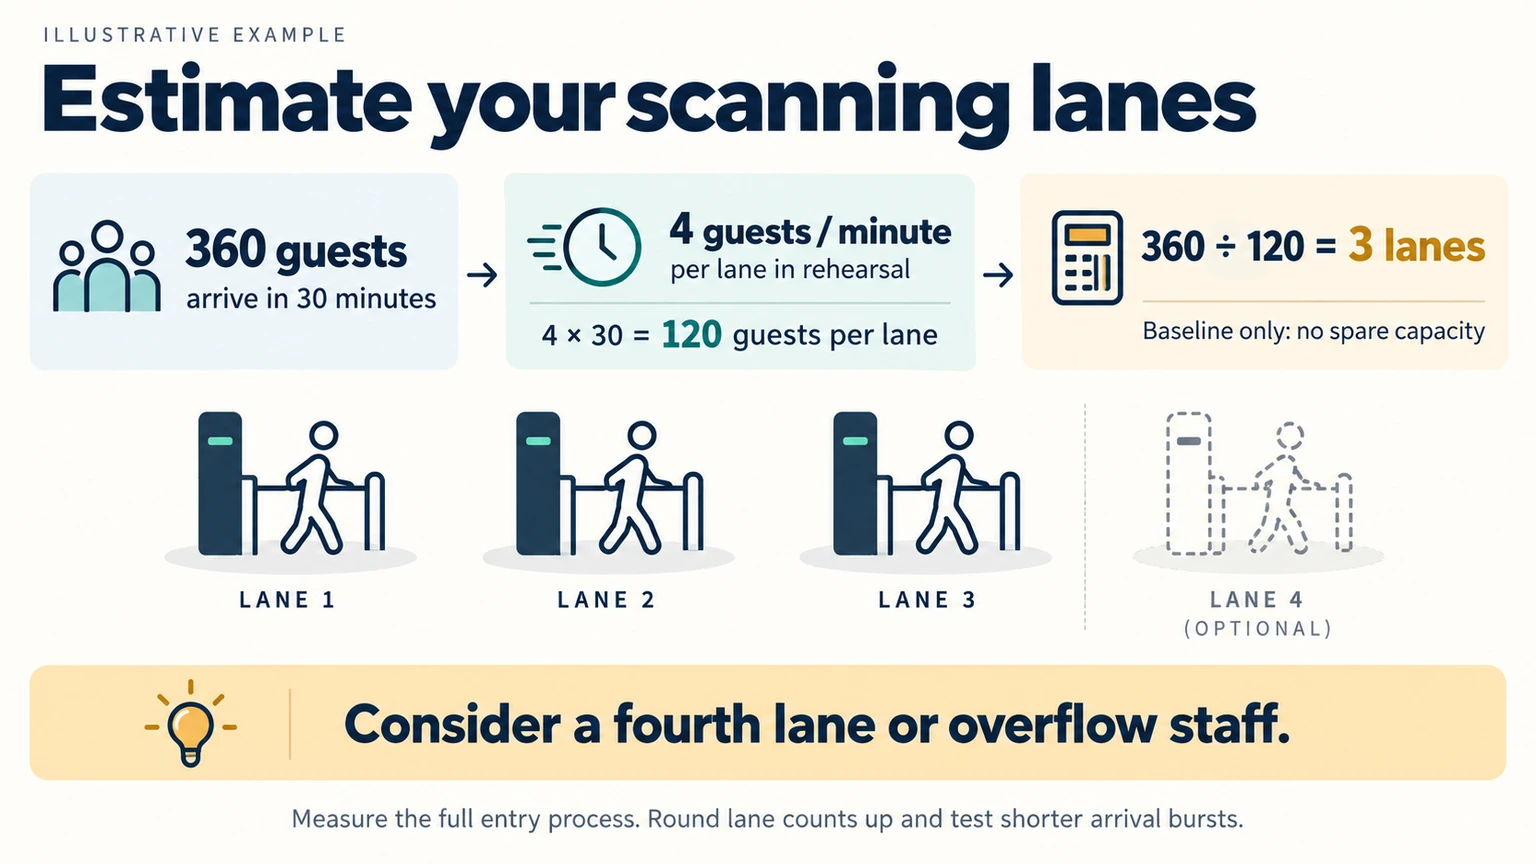
Now take your staff and devices and put your process to the test. For example, suppose you expect 360 guests in 30 minutes. Your rehearsal suggests that one lane can consistently process four guests per minute, including its assigned entry tasks. Count people who complete the lane, not just codes the camera reads.
- One lane’s 30-minute capacity: 4 × 30 = 120 guests.
- Starting lane calculation: 360 ÷ 120 = three lanes.
- Under this example, those three lanes would have no additional time to process any extra attendees. Having a fourth lane ready to open or having reserve staff at the ready to handle “overflow” lane attendees can help prevent check-in bottlenecks and delays.
These figures are an illustration only. The numbers and timing will depend on the actual number of people in a lane, variables such as children and older eventgoers, the weather and more. Repeat the calculation for entrances that serve different groups, and check shorter arrival bursts too.
How many staff members do you need with the scanners?
At TicketsCandy, our scanner app reads QR tickets from phones or printed tickets. Each successful scan checks the attendee in and updates your attendee list in real time. That keeps ticket validation and attendance connected. The next step is planning how your team will use those tools at the entrance. See our scanner app details.
Three scanning lanes don’t necessarily mean you only need three staff members there. You may also need a:
- greeter
- someone applying wristbands
- on-site sales operator
- help-desk lead to resolve ticket problems
At a smaller event, one person might combine roles, particularly during quiet periods. But when there is an expected rush, the person handling a disputed ticket shouldn’t also be the only scanner.
Configuring your tickets
Before you start selling tickets you will need to decide what each ticket allows the attendee to do. That means when can they enter, what can they bring, if they can transfer a ticket, if they can ask for a refund etc. Once these rules have been decided, you will need to post them on your event page and everywhere else that you list your event sales information. As you and your team are developing those rules, consider:
- Will every attendee need a separate ticket?
- If one person holds tickets for a group, what happens when they all arrive at separate times?
- Will kids need their own ticket? If so, at what age does that requirement start?
- Can attendees transfer their ticket?
- With a ticket, are admissions timed? If someone arrives early or late, what is the protocol for admission?
- Can an attendee transfer their ticket to another day or entry time?
- Is re-entry permitted? How will that be tracked?
If an event has a pre-set check-in time, our TicketsCandy scanner settings let you control how early and how late tickets can be scanned. Those settings can be matched to the published ticket rules.
One note: You will want to test these rules with a sample ticket set.
Tell attendees what to bring
It is always a good idea to prepare attendees for what to expect when they attend the event. This means sending them information about:
- where they can find their tickets
- which venue entrance to use
- what time they should arrive
- what ticket formats you accept (digital or print)
- if any separate identification will be required
- If there are security requirements
You may choose to send this information out prior to the event via an email or text message. You can use the following as a template for crafting your message:
We’re getting excited about [EVENT NAME]. Please be aware that the doors open at [6:00 p.m.]. To make your entry efficient, please use the entrance on [Oak Street]. Have your ticket displayed before joining the line. Turn up the screen brightness on your device to make it easier to be scanned. If you can’t find your ticket, visit the Ticket Help desk beside the entrance.
One very important addition: Include a contact option so attendees can resolve missing tickets before event day.
Can attendees use screenshots for entry?
Some attendees may want to use a screenshot of their ticket. Before making a decision, consider what the rules say about using screenshots. A clear screenshot of a static code may be readable, but the scanner needs to validate the underlying ticket. A screenshot doesn’t prove that a ticket is actually active or hasn’t already been used.
Some ticketing systems avoid this. Ticketmaster says screenshots won’t work for its moving-barcode tickets. Remember every ticketing platform is different so test what your format can do before you tell attendees exactly whether you can accept a screenshot.
Make sure all devices, connection points, and backup plans are ready
Before the event starts, set up any device that may be used and ensure that at least two people understand its key operational details. You should also confirm things like the supported operating system, app version, camera access, event connection, and permissions needed for each staff member’s role.
For TicketsCandy, you can do this by opening Event Dashboard → Event Settings → Ticket Scanner. In this section of the site you can find:
- An Event API Key to connect a scanner to an event.
- A Global API Key to connect it across the account.
Choose the appropriate key for the job you need your scanner to perform. (Remember to keep that key private.)
It’s also important to prepare the mechanics of the device by:
- charging them
- labeling them
- ensuring they have the correct cable and power packages
- knowing where the backup device is located
Don’t just assume that connectivity works either. Just because devices connect to the network in the office, doesn’t mean that they will perform as well in the queue. Test the Wi-Fi and/or cell service in the actual scanning lane positions.
Treat offline scanning as a specific capability
An attendee may have saved their ticket to their phone which means if they lose connectivity they can still present their ticket for entry. Being able to display a saved ticket does not mean your scanner can validate it offline.
Find out if your ticketing site supports offline scanning and, if so, what you’ll need to do to ensure that they can scan tickets and record the appropriate data for synchronization with your records.
- Ticket Tailor, for example, documents advance door-list downloads but has an internet requirement for synchronization. Ticket Tailor synchronization guide
- TicketSpice states that an offline device can’t see another device’s scans. While offline, that device also cannot download tickets sold after its last sync. TicketSpice scanning guide.
One issue with offline scanning can be the same ticket being used by multiple people. Remember not to assume that independent offline devices, even within the same ticketing platform, can reliably prevent the same ticket being accepted in two lanes.
If shared validation is unavailable in your platform, consider routing all offline admissions through one controlled station. If you are presenting a larger event, use provider-approved controls that assign each ticket to one admission station.
Have a connectivity fail protocol
Make sure that you have a strong process in place in the event that connectivity to your scanner is dropped. That process should include:
- Switch to a previously identified backup connection.
- Use scanners in offline mode but only if it is supported and prepared for.
- If validation remains unavailable, let the entrance lead decide whether to pause admission or use an organizer-approved manual list with clear limits. Keep one controlled record of manual admissions, including the ticket or order, admission time, staff member, and reason; do not check off separate copies independently.
- Reconcile ticket entries after connectivity returns. Compare manual admissions with system records before adding missing check-ins, and keep the original admission times in your incident record.
Keep in mind that the list you exported the day before the event can quickly become outdated as sales, cancellations, or transfers take place. Track when it was created, follow sales, and make an updated export as needed.
Structure entry lanes that keep guests moving
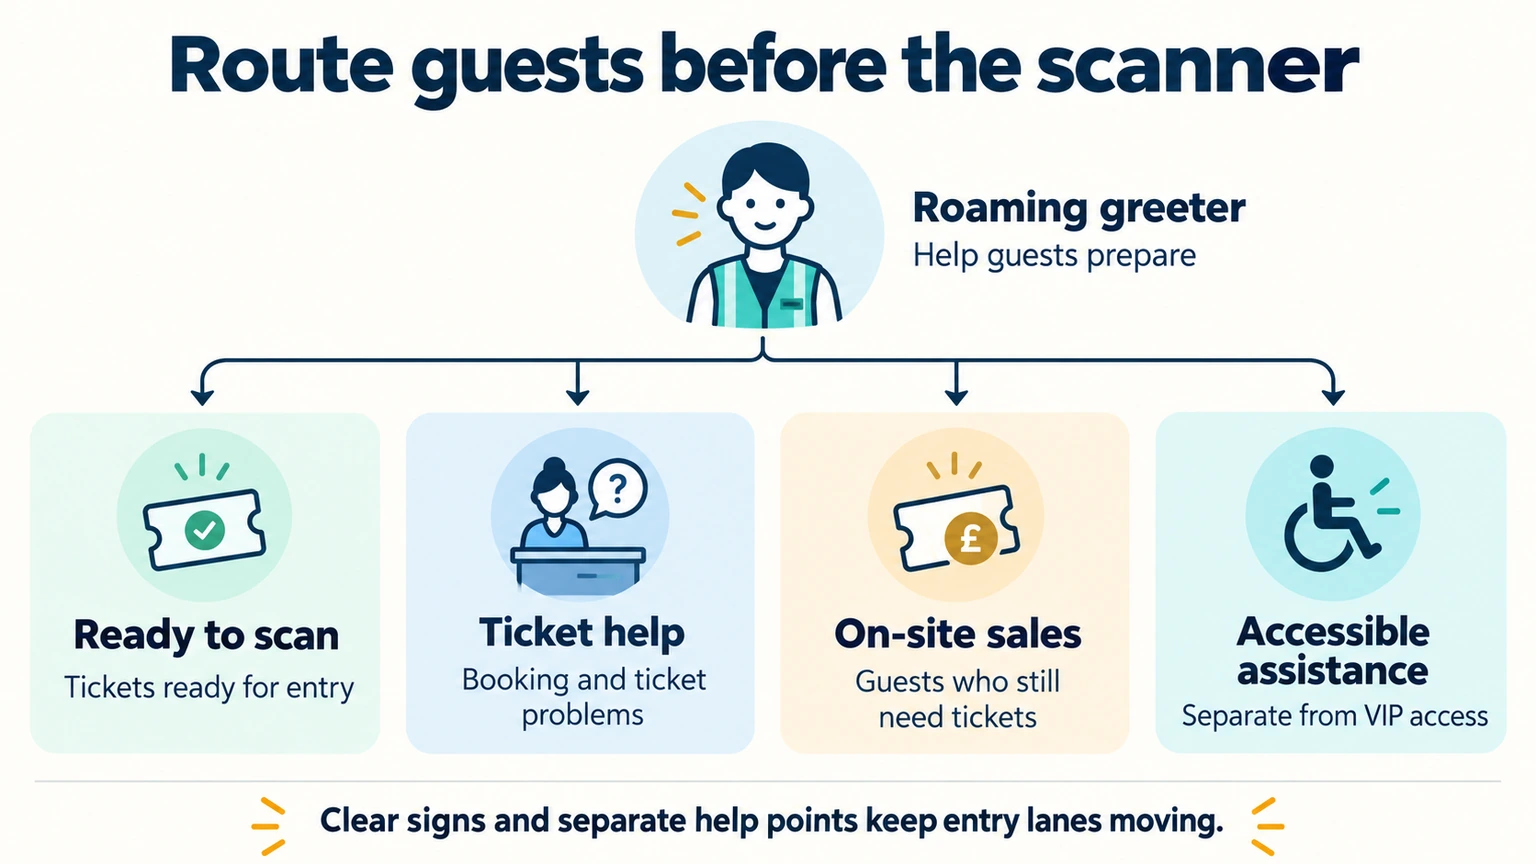
Place signs in clearly visible locations so a guest can tell where they need to be before they reach the scanner.
- Ready-to-scan admission: Guests with the ticket open and ready.
- Ticket help: A clear location for missing tickets, order searches, booking problems, and other exceptions.
- On-site ticket sales: Purchases and payment questions.
- Accessible entry and assistance: A clearly identified lane with appropriate space and staff support. Place VIP access in a separate location where needed as guests requiring assistance shouldn’t need a VIP ticket.
A roaming greeter can prepare guests before they reach the scanners. They can also answer questions around bag checks, ID checks, scanning, and credential collection so that attendees are ready when they reach the front of the line.
Train staff on how to scan tickets at the door
When you have a policy in place for scanning QR codes, it’s important to let your staff know what to expect both from what they will need to do on the day of the event and what they should expect from attendees. To help, create a staff reference guide like this one.
| Scan outcome | What staff should do | What to say |
|---|---|---|
| Valid admission | Confirm the result and relevant ticket type, record admission through the agreed process, provide any wristband or directions. | “You’re all checked in. Welcome!” |
| Already used (or a potential duplicate) | Send the guest to the Help Desk lead to review the ticket, available scan history, and re-entry policy. | “This ticket is showing that it was previously checked-in. If you can step over to our Help Desk they can check it with you.” |
| Wrong event, date, or time | Verify the booking and scanner’s event setup. Let the lead handle any permitted change. | “Let’s check your booking time at the Help Desk.” |
| Canceled, refunded, or replaced ticket | Review the affected ticket’s current admission status and the order history. Escalate rather than making a refund or transfer decision in the lane. | “We need to check the current ticket record before admitting you.” |
| Unreadable code or dead phone | Check brightness, glare, framing, and the correct ticket. If that doesn’t resolve it, use supervised lookup. | “We can help find your booking over here.” |
With TicketsCandy, you can use the Attendees page to support these tasks. On the page you have the opportunity to search by name, email, or order ID as well as perform manual check-ins. Authorized team members can also use the Orders tools to resend tickets to an attendee or open them for viewing and printing. Many event organizers set up a Help Desk operator to use those tools.
With TicketsCandy, staff can use the lookup to match the correct order and individual ticket before checking anyone in. Different people can share a name, and one purchaser can hold several tickets, so a name alone is not enough to identify the right ticket.
It may be helpful to keep payment actions and admission actions distinct. The Orders guide in TicketsCandy explains that canceling a ticket will deactivate it. If a refund is needed that will happen in a separate step. Staff members can check the actual affected ticket record when resolving an order problem.
Briefing the staff before their shift
To ensure that each staff member is operating with the same understanding regarding scanning tickets, you can provide them a common set of directions. This is an example that you can tailor to fit the needs of your specific event.
“Confirm that the ticket is for the correct event. Wait for a successful check-in result before admitting anyone. Check-in only the people who are present. Any unresolved scans should be directed to [help-desk location]. Questions or concerns around admissions should be directed to [lead name]. Don’t reset a used ticket or change a booking without authorization from [lead name]. When scanning a ticket, if the connection fails, contact the [lead name] and follow the backup procedure. ALWAYS keep event attendee details private. Remember to hand over your device and unresolved issues at the end of the shift.”
Being firm (but friendly)
When there is a hitch with a guest during check-in the way you handle it can make-or-break their experience (and potentially the reputation of your event). And if you check your scanner for information an already-used message won’t tell you why it happened. The reason for the issue could be plentiful. It’s possible the guest may have opened the same ticket twice, mixed up a group order, or misunderstood re-entry. Make sure to give your event staff the information and processes to manage and escalate the issue.
This can include:
- Using the current validation and duplicate-scan alerts where supported. (One way to help avoid this issue is by working to keep ticket codes off social posts and avoid using real attendee tickets in training materials.)
- Limiting access to the information each role needs. Staff members using a scanner should see enough information to decide admission, using details like the ticket type, booking period, and any relevant seat or credential details. Information like billing details and unrelated personal customer data shouldn’t be included in the routine entrance conversation.
Every time a staff member needs to step in to manually override a process they should record the ticket or order, the approving staff member, the time, and the reason for the override. If the system doesn’t capture those details automatically, ask a Shift Lead to use a restricted exception log. You can provide temporary access to that to key team members. That access can be removed once the event has concluded.
Before the doors open, rehearse the full entrance process
Once the system is set up and staff has been trained, run a small practice queue with the people and equipment you’ll actually use. It’s important to have this rehearsal mimic potential real world scenarios. Include a:
- group arriving in parts
- dim phone screen
- printed ticket
- ticket for a different day
- already-used ticket
- canceled ticket
- order affected by a refund
For ticketing platforms that support transfers, test what happens to the original ticket and also the replacement ticket. In your test include a second scan on another device as well as with the same one. If you intend to use offline mode, include a controlled disconnect and reconnect test now too.
It’s important that when you run these tests you do so with designated test records only, and keep those records out of live attendance totals.
Through the entire test, time each part of the process. When the test has concluded, ask the staff where they felt there were connection issues, find out where they hesitated with an attendee issue. Could the help desk have resolved exceptions and allowed the scanners to continue helping other guests?
Once the areas of concern have been worked out, you are ready to open. Before opening, confirm:
- Every active scanner has the correct event, connection, power, and tested settings.
- All signs, entry routes, credential supplies, and help-desk tools are ready.
- Ensure that the entrance lead and relief staff are in place and all other staff members know who they are.
- That the backup connection and manual procedures are available.
Use check-in data to improve the next event
After all of your scanning devices and manual records have been reconciled, compare the expected attendance with your actual admissions numbers. In TicketsCandy, you can review the attendee check-in status and export attendee information from the event dashboard.
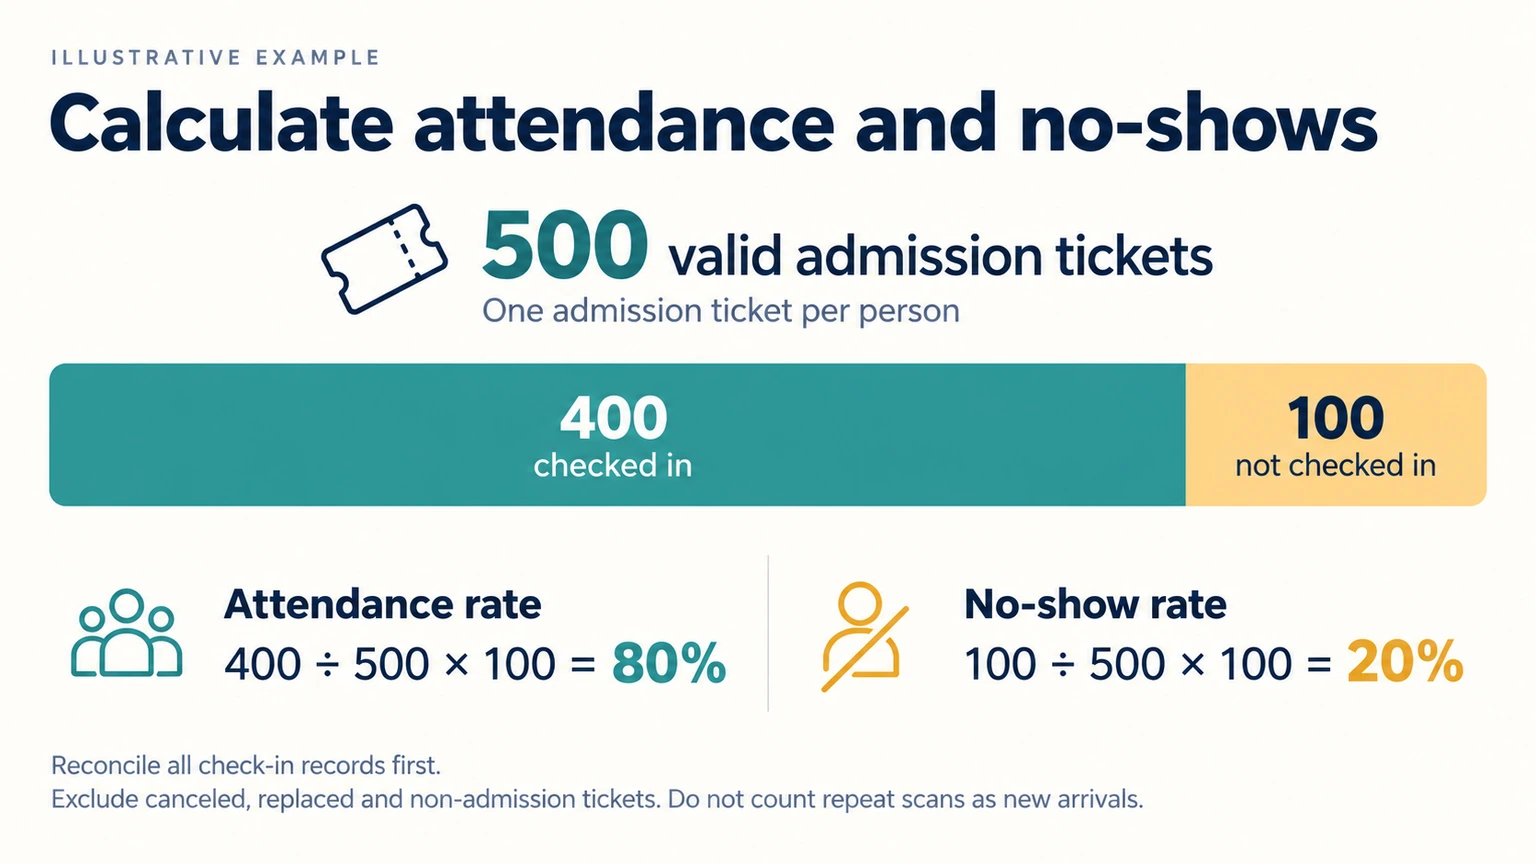
For an event with one admission ticket per person, use these formulas to understand the attendance and no-show rates.
Attendance rate
=
unique admission tickets checked in ÷ valid admission tickets for that event or session × 100
No-show rate
=
valid admission tickets not checked in ÷ valid admission tickets for that event or session × 100
As an example, 400 check-ins from 500 valid admission tickets gives an 80% attendance rate and a 20% no-show rate.
Within your calculations:
- Exclude canceled tickets, replaced transfer records, and non-admission products or add-ons.
- Treat repeat-entry passes and group tickets according to the people they actually represent. Repeated scans are not additional attendees. If there are no valid admission tickets, report the rates as not applicable.
- Break the results down by ticket type, session, and acquisition source when your available records support those connections.
- You should not assume every attendance export includes marketing attribution.
You should also review the specific operational details of the event. These may include:
- when the longest queues formed
- which exceptions were common
- whether any delays came from ticket retrieval, scanning, security, or general policy decisions
All of this detail can be used to generate a practical plan for the next event. Keep relevant scan and exception records for support and event review under your organization’s retention policy.
Putting the arrival experience to work
Providing your attendees with a fast event check-in depends on having:
- prepared guests
- reliable validation processes
- adequate lane capacity
- trained, knowledgeable, and empowered staff members
Before you have your next event, make sure to have your event staff walk through one ordinary admission and one difficult exception from start to finish. At each point in the process, confirm who makes each decision, where the guest waits while the process is unfolding, and how the final admission is recorded in the system.
If you’re setting up a QR code event check-in with TicketsCandy, first explore how TicketsCandy connects ticket sales and event-day management, then build an entrance plan around your event’s needs.